


Spalling brick is damaging your home’s value. Those flaking, crumbling surfaces aren’t just ugly. They’re expensive problems waiting to get worse. You don’t need to panic. Most homeowners can fix minor damage themselves.
This guide shows you exactly what causes brick to spall, how to spot problems early, and which repairs work long-term. You’ll learn when DIY fixes work and when professionals are worth the cost.
What we’ll cover:
What makes bricks crumble and flake, early warning signs you can spot yourself, repair methods that actually last, prevention strategies that save thousands, and solutions for chimneys and historic homes.
Your brick problems have solutions. Let’s fix them the right way.
What Causes Bricks to Spall?

Water is brick’s worst enemy. When water gets inside your brick, it freezes during winter. Ice takes up more space than water. This creates pressure from the inside. Think of it like a balloon being blown up inside your brick. Something has to give.
The brick surface cracks and flakes off. That’s spalling.
The Main Culprits
Poor drainage tops my list. I see this everywhere:
- Gutters that overflow
- Downspouts aimed at walls
- Ground that slopes toward your house
- Missing or damaged flashing
Salt damage comes second. Road salt, ice melt, and even ocean air eat away at brick over time.
Age matters too. Older bricks (pre-1950s) often have softer mortar. This makes them more prone to water penetration. Bad pointing work makes things worse. When someone uses the wrong mortar type, it can trap moisture inside.
What surprises most homeowners:
New construction isn’t safe either. I’ve repaired spalling on houses less than 10 years old. Poor initial drainage usually causes this.
How to Identify Spalling Brick Early
Start with a visual inspection. Walk around your house every spring and fall.
Look for these warning signs:
- Small chips or flakes on brick surfaces
- White chalky deposits (called efflorescence)
- Cracks in mortar joints
- Bricks that look “powdery” or soft
- Missing chunks of brick face
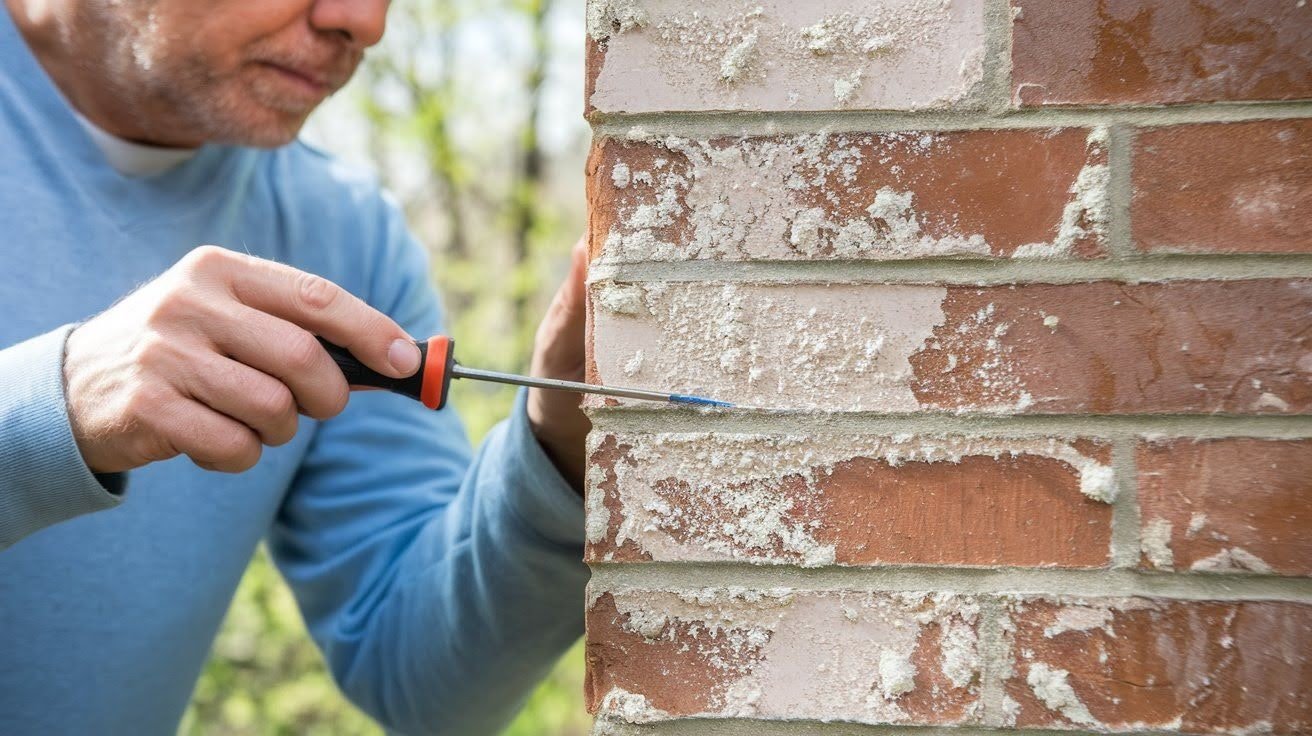
The screwdriver test works well. Gently press a flat screwdriver against suspect bricks. Healthy bricks feel solid. Spalling brick crumbles or gives way easily.
Where to Look First
Check these high-risk areas:
- Around windows and doors
- Near ground level (especially north-facing walls)
- Under roof edges
- Around chimneys
- Any area that stays wet after rain
Timing matters. Inspect right after heavy rain or snow melt. Water damage shows up best when surfaces are wet. Don’t wait until spring. Winter damage happens fast. I tell my customers to check monthly during freeze-thaw season. Small problems become expensive repairs quickly.
Professional Inspection Signs
Call a mason when you see:
- Multiple damaged bricks in one area
- Mortar falling out in chunks
- Bricks that sound hollow when tapped
- Visible cracks longer than your thumb
Document everything with photos. This helps track progression and assists contractors with estimates.
Spalling Brick Repair Options (DIY & Professional)
Small repairs? You can handle them. Major damage? Call a professional. How to tell the difference.
DIY Repairs (Minor Spalling)
You’ll need:
- Wire brush
- Chisel and hammer
- Mortar mix (type N for most homes)
- Pointing trowel
- Safety glasses and dust mask
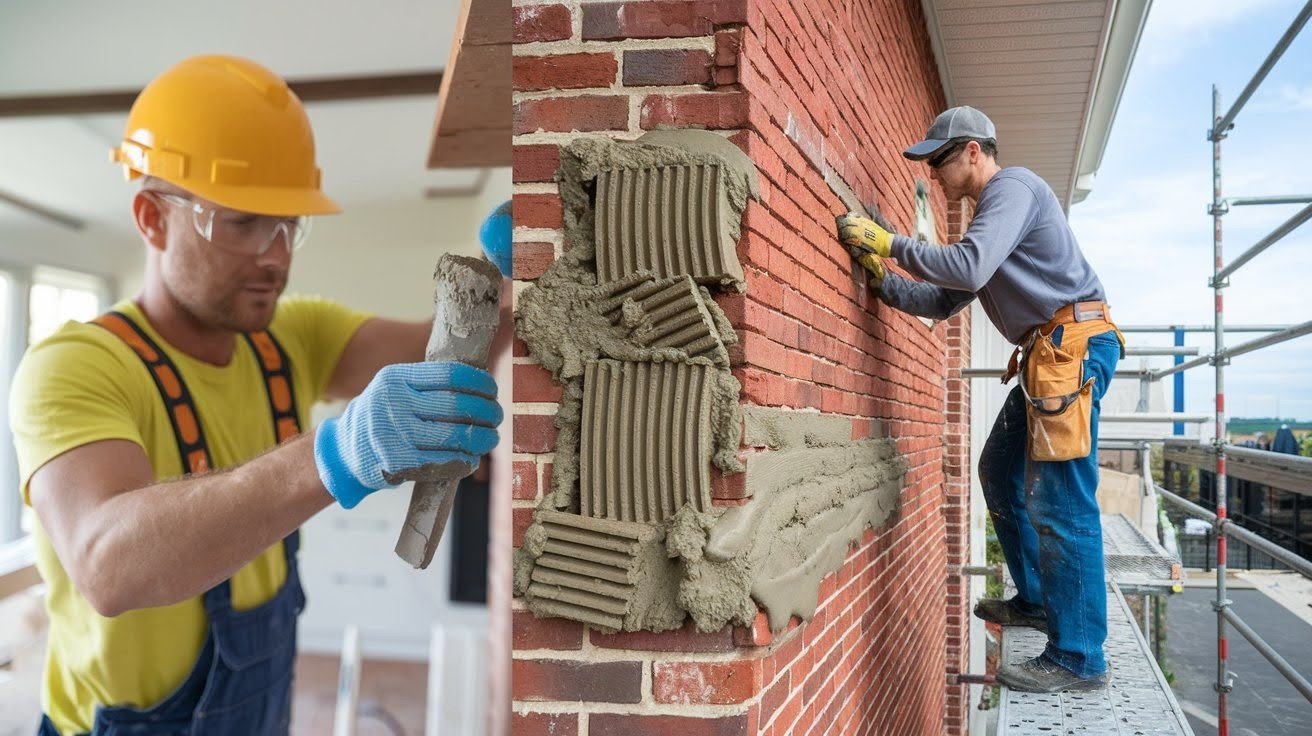
Step 1: Clean out loose material. Use the wire brush first, then chisel out anything that moves easily.
Step 2: Wet the area. Dry brick sucks moisture from new mortar too fast.
Step 3: Mix small batches of mortar. Only make what you can use in 30 minutes.
Step 4: Fill the damaged area. Press firmly and smooth with your trowel.
Important: Match your existing mortar color. Most home centers can help with this.
When to Call Professionals
These situations need expert help:
- Structural bricks showing damage
- More than 20% of wall area affected
- Damage near load-bearing elements
- Historic homes (special techniques required)
- Electrical or plumbing runs through affected walls
Professional repair costs vary widely:
- Small patch jobs: $200-500
- Full wall repointing: $5-15 per square foot
- Brick replacement: $10-30 per square foot
Get multiple quotes. Prices differ significantly between contractors.
Repair vs. Replace Decision
Repair when:
- Damage covers less than 25% of brick surface
- Structural integrity isn’t compromised
- Matching bricks are available
Replace when:
- Bricks are cracking through completely
- Damage keeps spreading despite repairs
- Safety concerns exist
My rule: If you’re repairing the same area twice, replacement makes more sense long-term.
How to Prevent Spalling Brick Long-Term
Prevention costs less than repair. Always. I’ve saved customers thousands with simple preventive measures.
Water Management (Most Important)
Fix drainage issues first:
- Clean gutters twice yearly
- Extend downspouts at least 6 feet from walls
- Grade soil away from foundation
- Install proper flashing around windows
Seal when appropriate. Use breathable sealers only. Brick needs to “breathe” or trapped moisture causes more damage. Never use plastic-based sealers on brick walls. These trap moisture and make spalling worse.
Regular Maintenance Schedule
Spring tasks:
- Inspect all exterior brick surfaces
- Clean out weep holes
- Check mortar joints for cracks
- Remove ivy or vegetation touching walls
Fall preparation:
- Clear debris from drainage systems
- Apply sealer if needed (every 5-7 years)
- Repair small mortar cracks before winter
Smart Landscaping Choices
Plant selection matters. Choose plants that don’t require frequent watering near brick walls. Sprinkler systems should spray away from walls, not toward them.
Mulch placement: Keep organic mulch at least 6 inches from brick surfaces.
Climate Considerations
Cold climates need extra attention:
- Use ice melt sparingly near brick surfaces
- Install proper vapor barriers during construction
- Consider brick type when building new
Hot, dry climates face different challenges:
- UV protection helps preserve mortar
- Shade structures reduce thermal stress
- Regular repointing prevents cracking
Special Cases: Chimneys & Historical Brickwork
Chimneys face different challenges. They’re exposed to weather from all sides and deal with temperature extremes.
Chimney Spalling Solutions
Common causes include:
- Missing or damaged chimney cap
- Deteriorated crown mortar
- Poor flashing installation
- Freeze-thaw cycles affecting exposed mortar
Quick fixes that work:
- Install quality chimney cap
- Repair crown cracks immediately
- Improve flashing seals
- Annual professional inspection
DIY chimney work isn’t recommended above roofline. Safety risks outweigh savings.
Historical Brick Considerations
Old buildings need special care. Modern materials often don’t work with historical construction methods.
Key differences:
- Softer lime-based mortars were standard
- Brick composition varies significantly
- Building codes didn’t address water management
- Thermal expansion wasn’t considered
Work with specialists for buildings over 100 years old. Historical preservation societies often provide contractor referrals. Matching materials becomes critical. Use lime mortars with soft historic bricks. Portland cement mortars can cause more damage.
Restoration vs. Preservation
Restoration means returning to original appearance using modern techniques. Preservation maintains existing materials using period-appropriate methods.
Know local regulations. Historic districts often require specific approaches and permits. Documentation helps. Photograph everything before starting work. This protects you and preserves history.
Special Tools and Techniques
Hand tools work best on historic masonry:
- Wooden mallets instead of metal hammers
- Natural bristle brushes for cleaning
- Traditional pointing tools for mortar work
Avoid power tools when possible. These can damage soft historic bricks and mortars. Chemical cleaning requires expertise. Wrong products dissolve historic mortar permanently.
Conclusion
Spalling brick doesn’t have to destroy your home’s value. You now know what causes it, how to spot it early, and exactly how to fix it. Start with your drainage system today. Fix gutters, extend downspouts, and check for standing water. These simple steps prevent 90% of future problems.
Small repairs you can handle yourself. Larger damage needs professional help. Don’t wait until winter makes everything worse. Inspect your brick every few months. Catch problems when they’re cheap to fix, not when they require major reconstruction.
Remember that prevention costs less than repair. Water management is your best investment.
Historic homes need special care. When in doubt, call local masonry experts who understand your area’s climate. Take action this weekend. Your brick walls will thank you for decades to come.
Frequently Asked Questions
Can I use regular concrete to fix spalling brick?
No, regular concrete is too hard and will cause more damage. Use type N mortar that matches your existing mortar’s strength and color.
How much does professional spalling brick repair cost?
Small patch jobs typically cost $200-500, while full wall repointing ranges from $5-15 per square foot. Get multiple quotes since prices vary significantly between contractors.
Will brick sealer prevent spalling completely?
Brick sealer helps but won’t stop all spalling if drainage problems exist. Only use breathable sealers and fix water issues first for best results.
How long do spalling brick repairs last?
Proper repairs using correct materials typically last 15-25 years. DIY patches may need touch-ups every 5-7 years depending on weather exposure.
Should I worry about small chips in my brick?
Small chips aren’t urgent but monitor them closely during freeze-thaw seasons. Address them before they spread since prevention costs much less than major repairs.